|
Lab 1: Soap, Surface, Tension, and other Sciencey Stuff
For this experiment I used a Styrofoam plate, water, dish soap, and a Q-tip. I cut the shape of the boat like the directions said, but I decided to make the opening at the bottom in the shape of a square. I then filled a small tub with water and placed the ‘boat’ on top. Finally I dipped the Q-tip in the dish soap and placed it on the water where the boat’s opening was. Automatically the boat glided away from the Q-tip which I thought was pretty cool. For the second part of the lab I used a plate, milk, food coloring, dish soap, and again a Q-tip. I poured the milk on the plate just to cover the bottom like the instructions said. I then added drops of food coloring to the center of the plate. Then just like before I dipped the q-tip in the dish soap and then dipped it in the middle of the plate. Like magic the colors started to move to the outside of the plate and this also looked cool. After finishing both of these labs I had a few questions about how this could happen. 1.) Why does the dish soap make the boat and the food coloring move, 2. Can you draw something out using the milk and food coloring method, and 3. How did someone discover this. For the first one I thought it might have something to do with the fact that dish soap had a greater density than milk and water, so it acted like water and oil would react. After researching it I found out that dish soap is a surfactant – that means that it breaks down the surface tension of water. As the surface tension is broken up, it creates enough of a force to push the lightweight boat across the surface. This also goes for the milk and the food coloring. For my next question I tried to do a drawing on my own but with my artistic skills, it was not working out. I then tried to find people who have actually done this, but most were just creating cool patterns with no real thought in it. So I moved on to my next question. I could not find a good article that explained it all, but I did find small notes that someone knew what soap was made out of, and so therefore tested its reaction with other components. After completing this lab, I think it could be classified as entertaining and educational at the same time. It has cool outcomes, but still having logic behind it. I really like doing this experiment because I had never done it before and the result was really cool to me. I think I would definitely do more experiments like this in the future, even if it is just for my enjoyment. Overall, this was a fun lab and the result was worth it. Lab 2: Super States of Matter- Supercooled Water This next lab was pretty cool. I used just one item which was a water bottle. I placed the water bottle (unopened) in the freezer for about an hour. Then I took it out and it still looked unfrozen to me. I then hit the top of the water bottle and like magic the water turned to ice from the top to the bottom. Then to make sure it was frozen I opened up the water bottle, and there was only a bit of water unfrozen, the rest was just ice. This surprised me because when I first took it out it looked like it was just liquid, and in a matter of seconds it froze. The main question I had was how did this happen, and also why this only worked on purified water. After doing some research I found out that this occurs when carbon dioxide lowers the freezing point of water. Because of this the freezer doesn’t the water until the impact of the hit causes enough force to return to the original freezing point. I think this only happens to purified water because it might have a different freezing point than let's say tap water. This experiment was pretty simple to do which was a bit boring waiting for the bottle to freeze, but the result paid off a bit. It was cool to see the water turn to ice, but it was all pretty short. If I were to do the lab again I would try to do it with other drinks and see if it can work with those. Overall this was an okay lab that makes you interested in the different forms of matter. Reflection Questions How do you get to the point where you need additional opportunities to get work done?
0 Comments
Rocket Motor Launch
Name: Victor S, Gabriel V, Jenni Fuel: Straight Black Powder and Balcol Charcoal Core Diameter: End Burner and 1qt inch drill Rocket Motor: (I had trouble moving the images the test curve, but you can find it in the Motor Thrust Curve file) To get the thrust curve we put our video into adobe premier and counted each frame and lookedat the thrust in the monitor. Then to get more data about how our rocket works and how it would perform with a rocket, we had to calculate T and t. T or big T stands for Average Thrust, and t (little t) stands for burnout time in seconds. To calculate little t, or the burnout time all we had to do was take the number of frames and divide it by 30 since the frames were 1/30th of a second. To calculate average thrust we added up every measurement taken from every frame, added it up, then divided it by 30 because the frames were 1/30th of a second after we divided it by 30 we also divided it by 5.01 which was our t (burnout time in seconds) because as it's stated in the name that's how long it took for the engine to burn out completely. Reflection:This was a very cool project especially when we tested the motors. At first since I did not have a partner I was planning to go solo. But then Andrew tolled me that I needed a partner so he put me with Victor and Gabe. I did not find it difficult to work with them since I had worked on a project with them before. Also we wanted almost the same type of motor so we just put our ideas together and finished our design. For the motor test I was not able to be there, but I did see the video and the burnout time was a bit longer than I expected, but at least the motor did not explode. Background Research Core: Made of solid iron and nickel. Earth's magnetic field (also known as the geomagnetic and magnetosphere) is the magnetic field that extends from the Earth's inner core to where it meets the solar wind, a stream of energetic particles coming from the Sun. The earth uses that to stop solar winds and most of the radiation from the sun. Outer Core: Made of liquid metals, like liquid iron and nickel. Silicates: Combination of silicon (si) and oxygen (o). 95% of earth's crust, and 97% of earth's mantle is made of silicates. When silicates in the mantle bond with the metals in the outer core, it produces metal silicates. Mantle: Made of molten rocks (silicates). That's where the molten metals meet with other things like silicates4. Crust: The outer, solidified mantle Earth = apple Crust = skin of the apple Chemistry: Silicon to Rocks
First, we poured the solution of 100 ml of sodium silicate and ionized water into test tubes. At the end of pouring, the solution of sodium silicate and water was in roughly a 2:3 ratio. Then we poured calcium chloride into one test tube. We had to be careful not to touch it because calcium chloride is a mild base similar to lye so it could burn your skin. Next, we poured cobalt chloride into a test tube, it started out as this red-purple color but then it turned into purple, green, and blue The little formations that took place at the bottom started releasing little strings of it to the surface of the water. Then Andrew added copper sulfate to another test tube, the color of the formation at the bottom was blue. At first, it didn't work that well but after a couple of minutes the pointy, bubbly things started to form. Reflection: I really didn't know what I expected from this lab, but it turned out to be pretty cool. It was really informative, and the way it looked at the end was pretty cool. 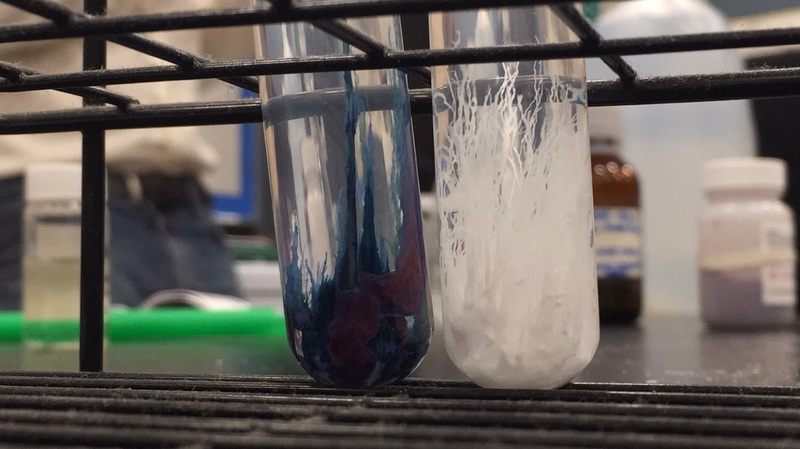 Rocket Motor (150 pts.) - This is part of the class project where me and one or two more people will come up with a design for a rocket motor.
Guided Activity (50 pts.) - I plan to do the first guided activity and post it on my blog to have some extra points in case. For this project I decided to take pictures of nature with a lens to see the small things we don't see. I took a picture of a flower first and then a rolly polly. The flower looked very beautiful, you could clearly seethe way the inside looked and how it had so much detail. For the rolly polly I was just taking pictures of it rolled up in a ball, but I wanted more. I wanted to get a shot of the rolly polly opening up. This was hard to do because the rolly polly would open up to quickly and try to crawl away. Then after so many tries I got the perfect photo. The lens I used was really simple to use. you just clip it in front of your camera and then take a picture. The shape of the lens is a dome, there fore the center of the image is always clear and magnified while the surrounding is a bit blurry. These types of lenses are mostly used in astronomy that is why they are given the name Whole-Sky Lens. If I were to do this experiment again I would find more small things to take a picture of a come out with some really nice ones. Also I would try to take a video with the fisheye lens. Overall this was pretty cool lab and it made me start to think how and who would think to make a device like this. The generation we live in is pretty great sometimes. 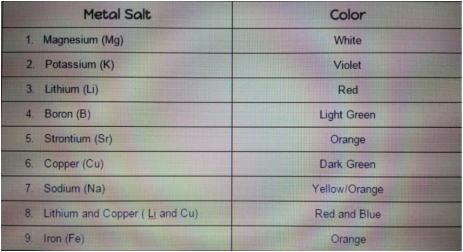 If I were to be given an unknown element, I would be able to use this information to figure out what element it is. I would burn it and let it rest so it can produce its color, then I would see if it matches with another color on the chart. With that I would be able to see what element it is. For this experiment we used a stance that held the fuel and the fuel tube, ten we used a spark to ignite the fire. Since the stance was Iron (Fe) so the flame was orange. Then Andrew got a bit of magnesium (Mg) and put it in the flame. As soon as it started to light up he lifted it away from the flame and it shined a bright white. It almost looked like the Lumos spell from harry potter. Then he dipped the small pipe in cold water to cool. We repeated this for all the metals and he let some people do it on their own. One interesting thing that happened was when Darian put in Lithium (Li) a bit of it fell into the flame and made it look red from then on. I really liked the small intro we had in the beginning because it gave us a better understanding of what was going on. It let me know why the light changes color and why it is different for different metals. All the metals looked cool in the flame, but my favorite had to be the Mg. I really liked this small experiment and hope to do more just like it. In the atoms of each element they have unoccupied energy levels. When energy is added to the atoms the electrons move up towards those levels, then once the energy is removed the electrons move back down and release there own spectrum of light. Each element has a different color because the atoms have different electrons and energy levels. Compared to other activities we have done in the classroom, this one was a bit more exciting. Unlike others where we had to see something that was exactly the same, this one was different every time and it amazed us and even the people around us that weren't doing the experiment. Overall I think it's fair to say that everyone enjoyed this experiment and we all learned a lot from it. I think this activity was fine the way it was, but if I really had to change or add something I would probably have more room so everyone can be spaced out for safety precautions and to let others see. One thing I took from this experiment was to always keep a cup of water close when working with hot/flammable objects. Also I learned that burning some metal salts can be really coo and at the same time very interesting so the next time I do a lab I should not push the research aside. For this project I had to build a rocket from scratch with a partner. My partner was Nancy and we really worked well together. The first thing we did was design our rocket. We followed the basic structure of a rocket and then just planned what materials we were going to use. Then we started building. We cut out strips of the brown paper for the body. We wrapped one strip of paper on to the pipe and taped it down (making sure there were no gaps). Next we wrapped the second strip going the opposite way, then finally the third strip going the same way as the first strip. Both of these layers were glued with wood glue. We set that aside to dry. For the fins we first thought of making it with the same material as the body, but it was too thin. So we decided to use two layers of card stock. Once the fins were ready we glued them on to the body of the rocket that we removed from the pipe. We spaced them out to give the perfect balance to the rocket. Next we started to make the parachute. We first made one with a big red plastic sign, but we had to rethink it because it was too big to fit into our rocket. We got an army man parachute from Jesus and used that instead. Then we started to make the nose cone. There is no pics of this because in the making I had an accident with the box cutter. Next we attached the shock cord and the parachute to the inside of the rocket and the nose cone. Then we made a motor holder to keep our motor in place. Finally we added the launch lugs which were made out of straws. After that Nancy took our Rocket to launch and it did not go as planned. The parachute did not deploy and the rocket was spiraling out of control. But even though our rocket failed, I still enjoyed making this rocket. I think the reason why the rocket was out of control was because the fins were not at the right angle so the wind moved the rocket in a weird way. The nose clone might have not deployed because the nose was on too tight, therefore it could not pop off for the parachute to come out. This was a pretty fun project, but if there was something I had to change it would probably be my working habits. I procrastinated a lot in this project, and that made me rush at the very end and not give much effort into the rocket. I f I were to do it again I would make sure to get as much done in the whole time I have in class, and if possible at home. To conclude this project was pretty educational since now I know and feel confident in in making a rocket. Now I can't wait to make another scratch rocket with scratch motors.
Looking Back: For this lab we had to make Oobleck. It was a runny substance that when applied pressure it would firm up. The question for this blog was "Is it a liquid or a solid?" To make Oobleck we mixed corn starch with a bit of water. There wasn't an exact measurement of these things, but you had to make sure to not add too much water to the corn starch. If you do it will be too runny and it won't firm up. My group got the right consistency and played with the Oobleck for most of the time. We did end up asking each other what we thought; was it a liquid or a solid? We ended up agreeing that it was a liquid that turned in to a solid when pressure was applied. I think the corn starch being really thick and the water being very light caused this to happen. If I were to do this again I would do more than just shape it into a ball. I would try freezing and heating it to see what would happen. I got a deeper understanding of what a solid and liquid truly is. Since I had to see what makes a solid and what makes a liquid to describe the Oobleck I became more aware of what they are. Overall this was a very cool project and very informative.
Looking Beyond: I think this happens because as the corn starch tries to absorb the water, the water is trying to dissolve the cornstarch. Since they are fighting it creates both a liquid and a solid. So when you had pressure, it is like you are trying to absorb the water, but once you let it go it goes back into a liquid. Looking Inward: I did get desired results once we made changes to our first attempt. I think it is pretty amazing that we can make something so complicated, with just two simple items. Also the fact that scientist can't even explain this, makes it even more amazing. Looking Outward: I worked with Morgan and Genivie and we worked pretty fine. It was a bit awkward at first since I didn't really know them and I just make every situation awkward. But once made the Oobleck the awkwardness went down a bit. Looking Forward: If I were to do this experiment again I would mess with the Oobleck a bit more. For example I would add food coloring, try heating and freezing it, ect. I would just do more things to try and change the form. |
Jennifer R.Grade: 10th Archives
November 2015
Categories |
 RSS Feed
