|
Rocket Motor (150 pts.) - This is part of the class project where me and one or two more people will come up with a design for a rocket motor.
Guided Activity (50 pts.) - I plan to do the first guided activity and post it on my blog to have some extra points in case.
0 Comments
For this project I decided to take pictures of nature with a lens to see the small things we don't see. I took a picture of a flower first and then a rolly polly. The flower looked very beautiful, you could clearly seethe way the inside looked and how it had so much detail. For the rolly polly I was just taking pictures of it rolled up in a ball, but I wanted more. I wanted to get a shot of the rolly polly opening up. This was hard to do because the rolly polly would open up to quickly and try to crawl away. Then after so many tries I got the perfect photo. The lens I used was really simple to use. you just clip it in front of your camera and then take a picture. The shape of the lens is a dome, there fore the center of the image is always clear and magnified while the surrounding is a bit blurry. These types of lenses are mostly used in astronomy that is why they are given the name Whole-Sky Lens. If I were to do this experiment again I would find more small things to take a picture of a come out with some really nice ones. Also I would try to take a video with the fisheye lens. Overall this was pretty cool lab and it made me start to think how and who would think to make a device like this. The generation we live in is pretty great sometimes. 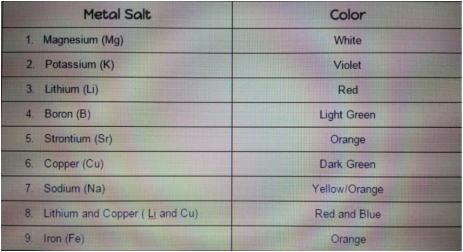 If I were to be given an unknown element, I would be able to use this information to figure out what element it is. I would burn it and let it rest so it can produce its color, then I would see if it matches with another color on the chart. With that I would be able to see what element it is. For this experiment we used a stance that held the fuel and the fuel tube, ten we used a spark to ignite the fire. Since the stance was Iron (Fe) so the flame was orange. Then Andrew got a bit of magnesium (Mg) and put it in the flame. As soon as it started to light up he lifted it away from the flame and it shined a bright white. It almost looked like the Lumos spell from harry potter. Then he dipped the small pipe in cold water to cool. We repeated this for all the metals and he let some people do it on their own. One interesting thing that happened was when Darian put in Lithium (Li) a bit of it fell into the flame and made it look red from then on. I really liked the small intro we had in the beginning because it gave us a better understanding of what was going on. It let me know why the light changes color and why it is different for different metals. All the metals looked cool in the flame, but my favorite had to be the Mg. I really liked this small experiment and hope to do more just like it. In the atoms of each element they have unoccupied energy levels. When energy is added to the atoms the electrons move up towards those levels, then once the energy is removed the electrons move back down and release there own spectrum of light. Each element has a different color because the atoms have different electrons and energy levels. Compared to other activities we have done in the classroom, this one was a bit more exciting. Unlike others where we had to see something that was exactly the same, this one was different every time and it amazed us and even the people around us that weren't doing the experiment. Overall I think it's fair to say that everyone enjoyed this experiment and we all learned a lot from it. I think this activity was fine the way it was, but if I really had to change or add something I would probably have more room so everyone can be spaced out for safety precautions and to let others see. One thing I took from this experiment was to always keep a cup of water close when working with hot/flammable objects. Also I learned that burning some metal salts can be really coo and at the same time very interesting so the next time I do a lab I should not push the research aside. For this project I had to build a rocket from scratch with a partner. My partner was Nancy and we really worked well together. The first thing we did was design our rocket. We followed the basic structure of a rocket and then just planned what materials we were going to use. Then we started building. We cut out strips of the brown paper for the body. We wrapped one strip of paper on to the pipe and taped it down (making sure there were no gaps). Next we wrapped the second strip going the opposite way, then finally the third strip going the same way as the first strip. Both of these layers were glued with wood glue. We set that aside to dry. For the fins we first thought of making it with the same material as the body, but it was too thin. So we decided to use two layers of card stock. Once the fins were ready we glued them on to the body of the rocket that we removed from the pipe. We spaced them out to give the perfect balance to the rocket. Next we started to make the parachute. We first made one with a big red plastic sign, but we had to rethink it because it was too big to fit into our rocket. We got an army man parachute from Jesus and used that instead. Then we started to make the nose cone. There is no pics of this because in the making I had an accident with the box cutter. Next we attached the shock cord and the parachute to the inside of the rocket and the nose cone. Then we made a motor holder to keep our motor in place. Finally we added the launch lugs which were made out of straws. After that Nancy took our Rocket to launch and it did not go as planned. The parachute did not deploy and the rocket was spiraling out of control. But even though our rocket failed, I still enjoyed making this rocket. I think the reason why the rocket was out of control was because the fins were not at the right angle so the wind moved the rocket in a weird way. The nose clone might have not deployed because the nose was on too tight, therefore it could not pop off for the parachute to come out. This was a pretty fun project, but if there was something I had to change it would probably be my working habits. I procrastinated a lot in this project, and that made me rush at the very end and not give much effort into the rocket. I f I were to do it again I would make sure to get as much done in the whole time I have in class, and if possible at home. To conclude this project was pretty educational since now I know and feel confident in in making a rocket. Now I can't wait to make another scratch rocket with scratch motors.
|
Jennifer R.Grade: 10th Archives
November 2015
Categories |
 RSS Feed
